How To Seal Marble Countertops: Your Ultimate DIY Guide To Lasting Beauty
Marble countertops are undeniably stunning. Their elegant veining and luxurious feel can transform any kitchen or bathroom into a masterpiece. However, beneath that polished surface lies a truth about natural stone: it's porous. This means your beautiful marble is susceptible to spills, stains, and etching, which can quickly diminish its allure. But don't despair! Protecting your investment is simpler than you might think. In this comprehensive guide, we will cover everything you need to know about sealing marble countertops, including why it's crucial, when to do it, and a step-by-step application process that even a first-timer can master.
Why Sealing Your Marble Countertops is a Must-Do
Sealing marble worktops is an integral part of their maintenance routine, providing a vital layer of protection against stains, etching, and other potential damage. Marble, like all natural stone, is a relatively porous material. That means that liquids, especially acidic ones like coffee, wine, or lemon juice, can seep into the stone and leave unsightly marks or even permanently etch the surface. Sealing protects the stone from staining, which really helps you not worry about spilling coffee on your bright white counters.
Regular sealing while avoiding such mistakes keeps the finishing forever. It’s the best way to avoid stains and moisture from your countertops, ensuring your marble retains its pristine condition and luxurious appearance for years to come. Think of it as an invisible shield that preserves the beauty and integrity of your marble, giving you peace of mind and protecting your investment.
When is it Time to Seal Your Marble?
Knowing when to seal your marble surfaces is key to effective protection. You should seal your marble surfaces like countertops, floors, and other high-traffic places regularly. But how often is "regularly"? It depends on the marble's porosity and how much use it gets. Thankfully, there's a simple test you can perform to determine if your countertops are ready for a fresh seal.
The Water/Oil Test: Are Your Counters Ready for a Seal?
This easy test will tell you if your marble is absorbing liquids, indicating it needs sealing. Follow these tips for using a petroleum-based liquid or solvent to determine your countertops’ seal:
- Put a few drops of mineral oil in an out-of-the-way spot on your counter.
- Leave a few drops of mineral oil or water on your counter for a few minutes. It should be 4 minutes for the water and 10 for the mineral oil.
- Wipe the liquid away.
If the marble darkens or the liquid soaks in, it's a clear sign that your countertop is absorbing moisture and needs to be sealed. If the liquid beads up on the surface, your seal is still doing its job.
Can You Seal Marble Countertops Yourself? Absolutely!
Well, have no fear because we are here to help, and with a few simple instructions, you can learn how to seal your gorgeous marble countertop yourself. Most homeowners can seal marble countertops. It’s quick, easy, and doesn’t require specialist tools or safety precautions. It’s also inexpensive—even a high-quality sealant for large areas won't break the bank. You don't need to hire a professional; with the right materials and a little bit of time, you can achieve professional-level protection.
Your Step-by-Step Guide to Sealing Marble Countertops
Learning how to seal marble countertops the right way is straightforward. Follow these steps to ensure effective sealing and long-lasting protection for your stone surfaces.
Step 1: Gather Your Sealing Arsenal
Before you begin, make sure you have everything you need. Gathering your tools beforehand will make the process smooth and efficient. You’ll need:
- A marble cleaner (pH-neutral, specifically designed for natural stone)
- A soft cloth or sponge
- A paintbrush, foam brush, or roller (for applying the sealer)
- Your chosen stone sealer
- Protective gloves
- Clean, dry towels for wiping excess
Step 2: Prepare the Surface
To ensure your stone finishes are ready, perform all preparation before beginning any sealing. This is a crucial step that often gets overlooked. Clean the surface thoroughly using your marble cleaner and a soft cloth. Remove any dust, grime, or spills. After cleaning, let your marble counters dry completely. Any moisture trapped under the sealer can lead to a hazy finish or prevent the sealer from bonding properly. Ensure the countertop is bone dry before proceeding to the next step.
Step 3: Choosing the Right Sealer (and Why it Matters)
This is perhaps the most important decision in the process. After cleaning, you should apply a few coats of a sealant specifically made for natural stone surfaces to protect your marble countertop. Buy an acid-resistant sealer for added protection. We recommend Superior Zero Ultra Stone Protector, which can be found at MrStone.com, as it’s proven to be the best sealer we’ve experimented with. Another excellent option is Dry-Treat Sealer, which is considered the best available sealer for people who have marble countertops. Dry-Treat penetrates the surface and allows the material to breathe, offering deep and lasting protection.
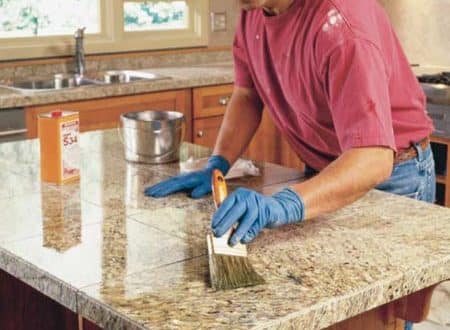
Step 4: Apply the Sealer Generously
Once your counters are clean and dry, it’s time to apply the stone sealer. Spray a generous amount of sealer across the dry marble countertops. Don't be shy; you want to ensure the entire surface is covered. If you're using a liquid sealer that's not in a spray bottle, pour a small amount directly onto the counter and spread it evenly with your paintbrush, foam brush, or roller. Work in small sections if your countertop is very large to ensure even coverage. Apply a few coats, following the manufacturer's instructions for drying time between coats. This usually involves waiting a few minutes for the first coat to absorb before applying the next.
Step 5: The Final Wipe-Down and Curing
After the recommended number of coats and the final waiting period (check your sealer's instructions, usually 10-15 minutes after the last coat), use a clean, dry cloth to wipe off any excess sealer from the surface. You don't want any residue to dry on top of the marble, as it can leave a sticky or hazy film. Buff the surface gently to a clean finish. Most sealers require a curing period, which can range from a few hours to 24-48 hours, during which you should avoid using the countertop or exposing it to water. This allows the sealer to fully penetrate and bond with the stone, creating that durable protective layer.
Post-Sealing Care: Keeping Your Marble Pristine
Sealing is a vital step, but it's part of a larger maintenance routine. To protect your marble countertop, choose and test a sealer, apply your chosen sealer, and keep the countertop clean. Regular cleaning with pH-neutral cleaners designed for natural stone will help maintain the sealer's effectiveness and keep your marble looking its best. Always wipe up spills immediately, especially acidic ones, even with a sealed surface, as prolonged exposure can still cause damage over time. Regular sealing, while avoiding such mistakes, keeps the finishing forever.
In conclusion, sealing your marble countertops is an essential, yet simple, DIY project that offers immense benefits. It protects your beautiful stone from stains, etching, and moisture, ensuring its longevity and preserving its luxurious appeal. By understanding why and when to seal, and by following these straightforward steps, you can confidently maintain your marble surfaces, keeping them spotless and worry-free for years to come. Remember, a little effort in sealing goes a long way in protecting your significant investment.

How to Treat & Seal Granite & Marble Countertops | Lesher
Granite Paste Sealer - How To Seal Granite? - Eagle Stones Granite & Marble

How to Treat & Seal Granite & Marble Countertops | Lesher
